THE MAIN STREET FIELD GUIDE
A little help.
A street of possibilities.
Pick one thing you want to do. We’ll show you where to click, what happens next, and when your work is saved.
A plain-English guide to the live app · October 24, 2026

- Sign in to your own account.
- Open the newsstand or a shop door.
- Choose one task and follow its first step.
- Wait for the save confirmation before leaving.
WHERE WOULD YOU LIKE TO START?
Find the job you came to do.
Your workspace
Run the town
When you need a hand
You can visit public shops without an account. Your saved workspace, town-owner tools and private company apps have different access rules. The guide tells you which is which.
Start here
Sign in and find your way
WHO CAN USE IT · Everyone
Main Street is a place to visit shops and make a street of your own. You can explore without signing in. Sign in to save your own work.
- Open Main Street and choose Sign in. Use the email and password for your own account.
- New here? Ask the town owner for a private invitation. Open that link, choose a password, repeat it, then choose Start building. Public registration is closed.
- On a phone, open the menu button at the top for navigation. Explore the street returns you to the main street.
- Save your password in your password manager. There is no self-service forgotten-password flow yet; ask the town owner for help if you cannot sign in. Never send your password in chat.
Start here
Explore the shops and rooms
WHO CAN USE IT · Everyone
Start with one door that interests you. The illustrated street is the navigation.
- Swipe or scroll sideways along the street. Choose Skip to finished street if you want to skip the painting animation.
- Tap a building or use Shops & rooms to find a place by name. Choose a visible object or product inside to look closer.
- Use Meet the Guides when you want a shop guide. You can browse their choices without chatting. Live guide chats are AI and may make mistakes.
- For a purchase, follow the product’s checkout button and read the destination. Main Street’s manual shop workspace points to the seller’s checkout; it does not collect payment or fulfill an order itself.
Start here
Use the newsstand
WHO CAN USE IT · Public news; some links depend on your account
The newsstand is the newspaper stand on the street. It opens a panel over the street.
- Open Main Street and tap the newsstand near the start of the street. You can also find it with the street directory.
- Read the edition. If your account has the private setup board, choose Your business setup board near the top.
- On What You Do Avenue, town owners see The rundown in the newsstand. It summarizes the information currently available to that account.
- Close the panel with its X, or press Escape on a keyboard, to return to the street.
Your workspace
Move one setup task forward
WHO CAN USE IT · The founding owner’s private board
The board keeps tasks in four columns: To do, Doing, Waiting and Done. Each card is one task with smaller steps inside.
- Sign in, open the newsstand, then choose Your business setup board. Or open the board directly with the button below.
- Click a card to open it. Read the steps. Tick a box only after you have actually completed that step.
- Write reminders in Your notes and choose a Due date if useful. Choose Save details and wait for Saved to your account before leaving.
- Use Move to to choose a column. On a computer you can also drag a card. On a phone, tap the column tabs to see its cards.
- Use Add a card for a new task, or Find a card to search. Keep the next action small enough to do in one sitting.
Your workspace
Open What You Do Avenue and 1Key
WHO CAN USE IT · The avenue is public; private tools require permission
What You Do Avenue holds workspaces. 1Key is a separate private company workspace reached through Main Street.
- Open Main Street. Choose the What You Do Avenue button at the top, or find it in the phone menu.
- Tap a room to open its tool. An access message means that room is private; signing in and being a town owner are different permissions.
- To open 1Key, choose the 1Key button at the top of either street. Use your Main Street sign-in if prompted.
- If 1Key still denies access, ask its workspace administrator to check your membership. A Main Street account does not automatically grant access to company records.
Make a shop
Build your first shop
WHO CAN USE IT · An invited account
Your street is the place. Your shop catalog is the list of products you put in it. Give each a name you will recognize.
- Open the shop workspace and sign in. If you already made a street, open that saved street instead of starting again.
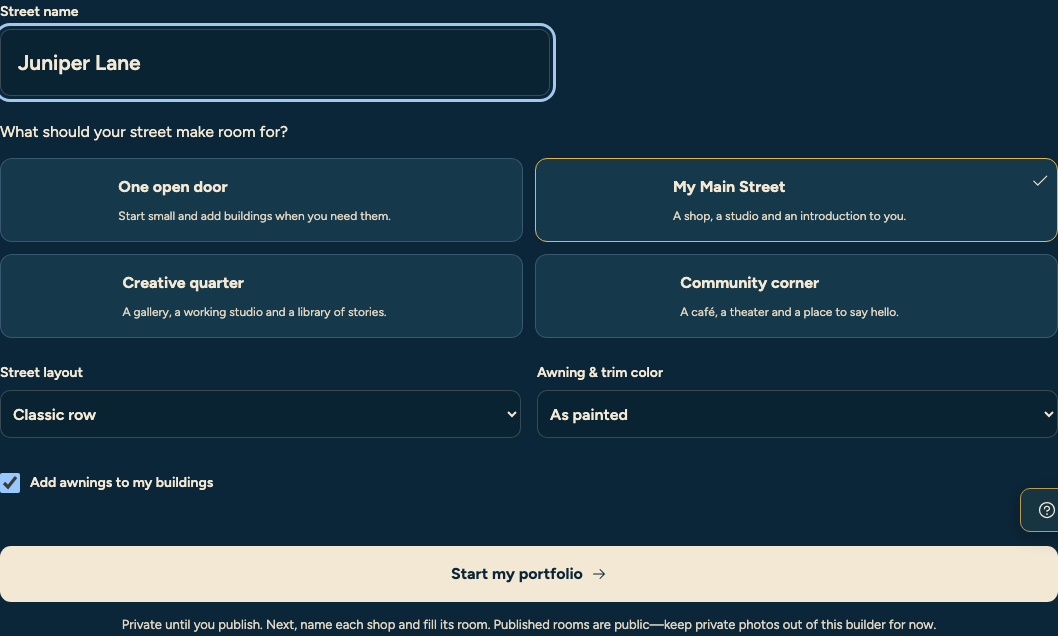
- For a new street, enter Street name and pick a street style, Painted or Wool. Template, layout and awning choices sit under More choices with sensible defaults. Choose Start my portfolio.
- Your catalog is created for you, named after your street. It begins empty and belongs to your account.
- In Build your shop, choose Edit beside a building. Work through its name, look and room. Choose a facade you like; you can change the appearance later.
- Choose Inside to enter a room. For your first product, use Gallery and Decorate this room. Wait for the saved state before closing the editor.
Make a shop
Put a product in the room
WHO CAN USE IT · Your own catalog or an authorized catalog
Add a product’s details once in the catalog, then place that product in the room.
- From the shop’s room editor, open Add a product to the shared catalog. Shared means it can supply your authorized displays; it does not make your private catalog visible to everyone.
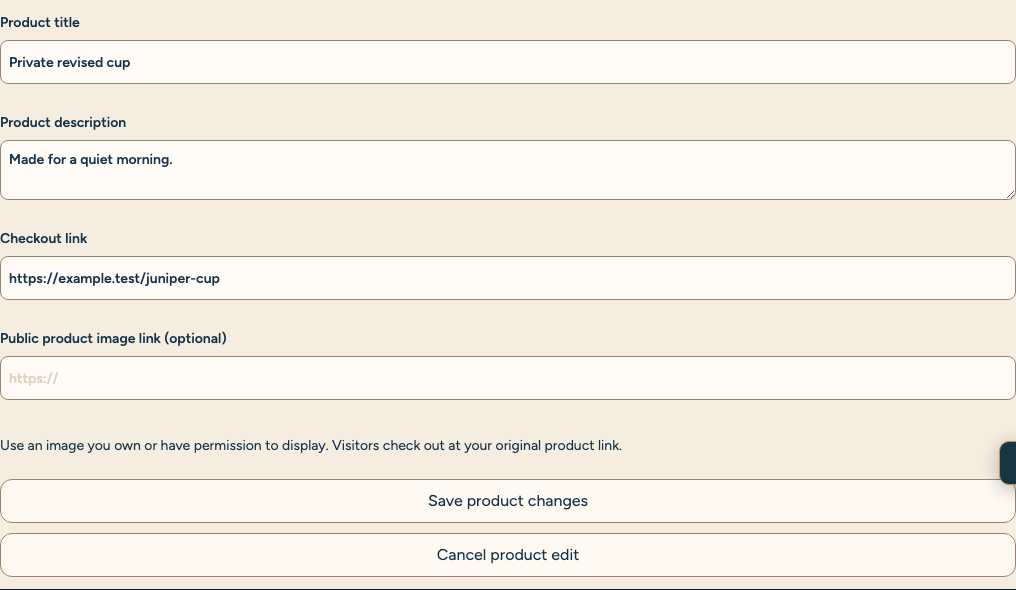
- Enter a Product title and description. Paste the full https:// checkout link for that exact item. Check the destination yourself before publishing.
- Add an optional public image URL if you have one you may use. A file on your computer or a private drive link will not work as a public image.
- Choose Add product. Next choose Place product beside it and put it in the room’s display. Wait for the save confirmation.
- To change it later, open Edit product details and choose Save product changes. The private draft changes first; review and publish again to update the visitor’s version.
Make a shop
Check it, then open your doors
WHO CAN USE IT · Your street’s owner or an authorized publisher
Saving keeps your work. Publishing chooses what visitors can see. Do both deliberately.
- In Build your shop, save your changes and check both phone and desktop previews. Choose Review street.
- Read the product title and description. Check the image and checkout destination. Remove anything that should stay private.
- Choose Open your doors. Copy Your public address from the confirmation.
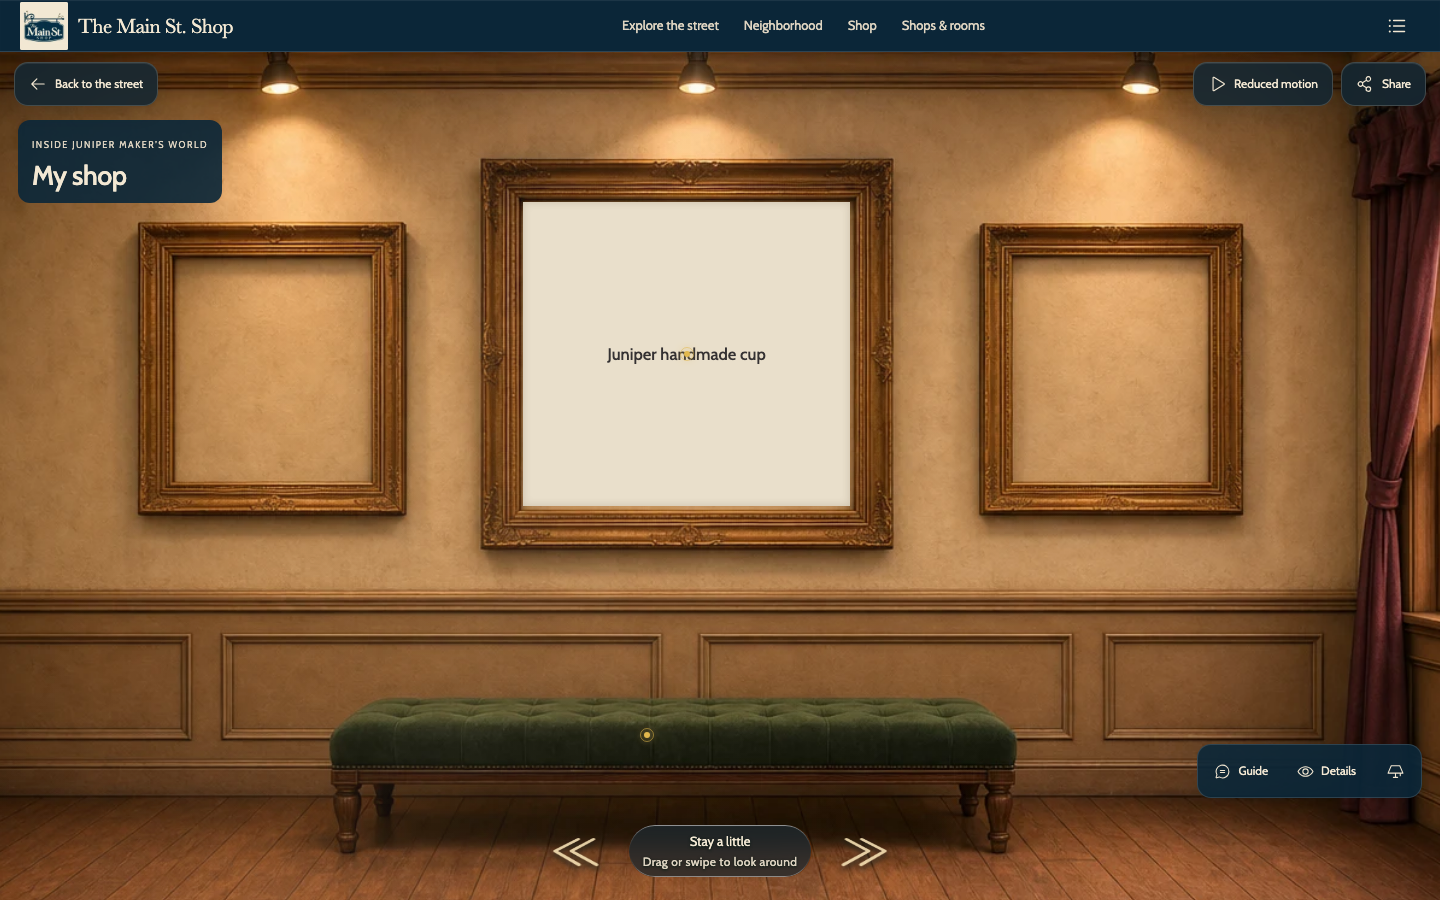
- Open that address in a private browser window, where you are signed out. Enter the room and try the product link. You do not need to buy it to check the destination.
- After a later edit, review and publish again. To hide the street, open Street visibility, choose Take street offline, and confirm. Your draft and catalog stay saved.
Run the town
Invite someone and choose their access
WHO CAN USE IT · Town owners; company membership is separate
An invitation and a role are two different things. Invite the person first, then grant only the access they need.
- In the shop workspace, open Invite friends if you have that option. In town administration, the corresponding tool is Invite a neighbor.
- Enter their name and email, then choose Create invitation link. Copy the private link and send it yourself. The app does not send it for you.
- They open the link and choose their own password. Each invitation works once and expires after seven days; make a replacement if needed.
- If they should run the town, add their account in Co-owners. For post reviews only, grant approver access in Posts to approve. Use the same list to remove that role later.
Run the town
Use the Lab to choose the next job
WHO CAN USE IT · Town owners
The Lab holds projects, helper status and the Muse desk. Use it to make the next action clear.
- Open What You Do Avenue, then the Lab. Read any Late or Blocked helper status before starting another project.
- Open a project card. Give it a clear next action and the right stage. Move it as the work changes, then archive it when you no longer need it.
- Use the Muse desk for a few current goals. Ask Jev can suggest which next steps fit those goals; it uses paid AI calls and its ranking is advice.
- Read the Agent log in town administration to see recorded actions. A report is not proof that an external service is connected or that a job is still running.
Run the town
Review public contributions and content
WHO CAN USE IT · Town owners; approvers have post-review access only
Use the named tool in town administration. Read its How this works note before making a public change.
- Open Diner notes or Book recommendations to review visitor submissions. Approve a suitable entry to show it publicly, or remove an approved entry from display later.
- Use Theater program for clips, posters and daily picks, and Record player for the music at home. Save a draft first, then publish when ready.
- Existing Posts to approve is a separate owner tool. If a draft is available, review its image, caption and scheduled date before Approve. Approval schedules it; it does not post immediately.
- To return a post, choose Send back and include a note. A draft with a past date needs a new date in Postiz before approval. This tool does not edit captions or delete posts.
Run the town
Find the studio, guides and private desks
WHO CAN USE IT · Varies by desk
The town’s desks do different jobs. Open the named desk for its own controls and access rules.
- Use Shops & rooms to visit public guides, or town administration’s Desks and studio links for the owner tools.
- Design Studio opens a separate design app. It has its own access gate; Main Street help cannot reveal or bypass its passcode.
- Spade’s back table, Figaro’s pin desk and Nora’s reel desk have their own scope. Read the desk’s disclosure before an AI request; some requests use paid calls.
- Den map, under Desks and studio, opens the FoxHaven team pages. If a page stays blank, use Open in a new tab. Those sites keep their own gates.
- Zeke's desk, linked at the top of Nina's avenue, saves a display name, tagline, https links, and room labels for Zeke's Roofing. Town owners open it. Add a co-owner in Town Hall when someone else should get in. It does not change membership inside the Zeke's company app.
- Use Account for your password, keys and connected tools. Never paste passwords, API keys or private account information into the help chat.
When you need a hand
Get unstuck, one step at a time
WHO CAN USE IT · Everyone
Use Help on Main Street to describe what you are trying to do. The walkthrough works even when AI chat is unavailable.
- Choose Help, select a topic, and follow the first step. Choose Next step when you are ready; Previous lets you go back. Only your topic and step number stay in this browser tab.
- For a question in your own words, choose Ask a question. Say the goal and the exact button or error you see. The AI knows the guide and page category, not your screen or private records.
- Use the suggested destination button to open the right page. The help agent cannot click controls, save work, publish, change access or send messages for you.
- If a reply is wrong or unclear, use the written steps or ask the town owner. Give the page, step and error, with a screenshot that hides private information. Do not include a password or invitation link.
When you need a hand
Fix the common sticking points
WHO CAN USE IT · Everyone
Check the message before repeating an action. A failed save and a saved change are different states.
- Missing button or Access denied: check that you used the intended account, then ask the owner or company administrator about the permission. Help chat cannot grant it.
- Save failed or offline: keep the editor open, copy any unsaved notes somewhere safe, reconnect, then try the explicit save again. Do not assume the change reached your account.
- Changed in another tab: keep a copy of your unsaved text, reload the latest saved version, then reapply your change. This protects newer work from being overwritten.
- Visitors see the old product: check that you saved, reviewed and published the new version. Then open the public address while signed out.
- An invitation expired or was used: ask for a new link. AI unavailable or chat limit reached: use the same topic’s written steps and try chat later.
One useful thing at a time.
Finish a real task. Update its card. Check what your visitor sees after publishing. Come back when you’re ready for the next one.
Back to Main Street →This guide and the help agent use the same instructions. AI can make mistakes; the numbered walkthrough remains available when chat is unavailable. Screenshots are examples, not private account records.